Menu definitions control how menu hierarchies appear within the JAMS Submit Jobs View. Customizing these definitions can allow users to quickly view and submit batch Jobs.

JAMS can also create a default menu which initially lists all available Folders. After the user selects a Folder, the available Job and Setup definitions are displayed.
 |
Note: Using Menu Definition to customized Submit Jobs hierarchies is optional. |
Adding a New Menu Definition
Defining a Menu Definitions is usually a two-part process. In the first step you add a new Menu Definition or modify an existing definition.
The second step involves inserting those definitions into the Submit Jobs properties to control the view display.
-
To add a new Menu Definition, click the Menus shortcut to open the Menu Definitions View.
-
Click the green Add button on the JAMS Ribbon to access the JAMS Menu Definition Wizard.
-
Enter the name and description for the new Menu. Click the Next button.
-
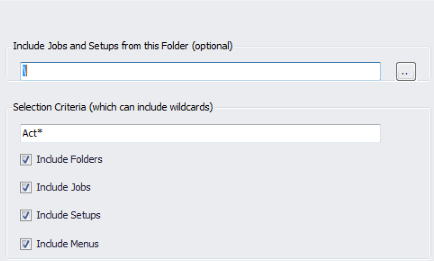
On the Menu Details page choose the Add button to access the Menu Details dialog box. This is where you define the Menu’s selection details.
-
There are several ways to use this dialog to control which Jobs and Setups appear in the Submit Jobs View.
- Use the File Browser button to open a Folder search dialog that lists available Jobs and Setups. Double-click on the desired Job or Setup. This action closes the dialog and populates the Include Jobs and Setups property.
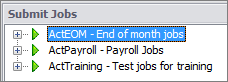
- Use the Selection Criteria property to narrow your search. For example, if you only want Jobs and Setups appear with the name ‘Test’, use a wildcard variable. For example, entering *Test may return results such as, "JAMSTest" or "UserTest". As shown in the screenshot at the end of this topic, entering"Act*" as the selection criteria returns ActEOM, ActPayroll and ActTraining.
- Select the appropriate checkbox to display specific types of JAMS elements (Folders, Jobs, Setups and other Menu definitions).
- Choose the window’s close button and confirm any changes. A new Menu Definition listing now appears in the Menu Definitions View.
Modifying or Deleting Existing Menu Definitions
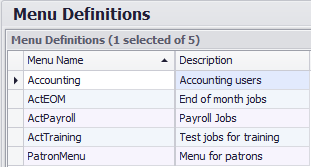
Existing Menu Definitions can be viewed and modified by double-clicking the desired listing from the Menu Definition View. Each Menu Definition contains two tabs: Menu and Includes.
- The Menu tab displays the selected Menu Name, Description and Last Changed date and time.
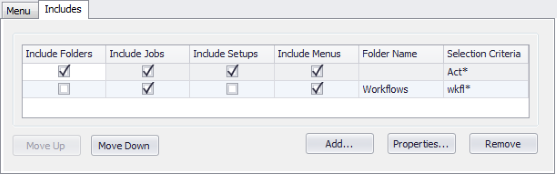
- The Includes tab contains checkbox selection settings similar to the Menu Details dialog described in the previous section. Make any changes to the current selection criteria and click the window's close button. Or alternatively, insert a new selection criteria by choosing the Add button.
- Use the Remove button to delete unwanted selection criteria from the list.
After completing the modifications, click the window close button to save any changes.
Using Menu Definitions to Customize the Submit Job View
The second step is to customize the Submit Jobs View with the new Menu Definition. Follow the steps below to redefine this View.
-
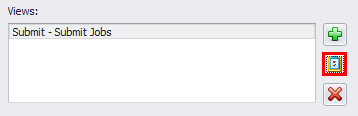
Right-click the Submit Shortcut to open its context menu and select the Properties command to access the shortcut's properties window.

-
On the Views section, click the properties icon shown in red.
-
This action opens the Submit View’s properties dialog. In the example below, the existing Menu Definition, “Accounting” has been entered into the Initial Menu Name property.
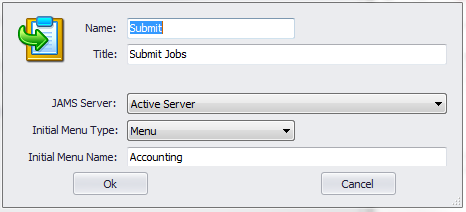
-
Click OK to save the View changes.
-
Open the Submit Jobs View. Notice how the View pulls in the ‘Accounting’ Menu Definition selection criteria that includes all folders and menus with “Act” as a prefix.