The Projected Schedule displays a graphical view of pending JAMS Jobs and Setups. Users can view all scheduled Jobs or filter a subset of Jobs over a specified time range.
To generate a projected schedule for all scheduled Jobs, click on the Projected Schedule Shortcut in the Shortcut Bar. The resulting display defaults to the current 24 hour timeline view.
Filtering the Projected Schedule Results
To filter a specific group of Jobs and Setups, use the Query button located on the JAMS Ribbon Bar.
- This action opens the query dialog box. Select a Folder Name using the Folder search button or enter a Job Name.
 |
Note: including multiple Job entries is not allowed; however, the Job Name field does allow for wildcard queries (e.g., *workflow). |
- Enter a Time Range using the date and time selector.
- Activate the appropriate checkboxes to refine your query.
- Use Current Schedule: when enabled, pulls in the current schedule from the Monitor View.
- Include Planned: filters all scheduled Jobs including those with the “Automatically Submit?” option unchecked.
- Include Repeated: when checked, this option includes all Job repetitions in the schedule.
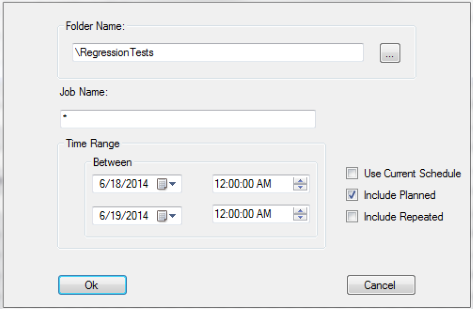
- Click the OK button to build the Projected Schedule based on your query parameters.
Modifying the Timeframe Display
After generating a Projected Schedule, users can modify their results by selecting different views: Day, Work Week, Week, Month and Timeline.
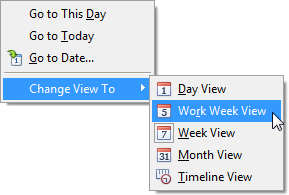
- To change the timeframe, right-click within the Projected Schedule display to view the context menu.
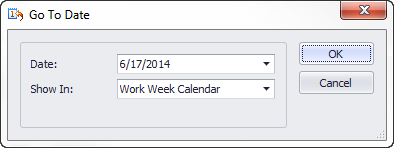
- Make a selection from the Change View To submenu or use the Go to Today or Go To Date options to modify the timeframe display. Depending on the selected view, you can also adjust the Time Scales and Captions.
|
Note: to zoom in and out of any Projected Schedule display, hold down Ctrl key while scrolling the mouse wheel. |
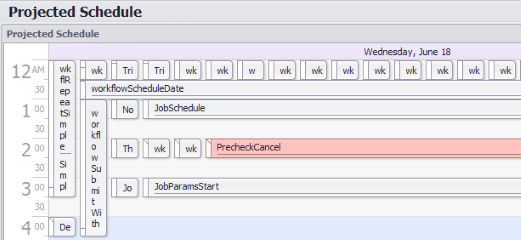
Color Flags
The Projected Schedule display uses specific color flags when a Job’s execution time deviates from its set parameters as detailed below:
- Items (Jobs or Setups) in red are expected to run beyond their designated SLA (Service Level Agreement) time.
- Jobs and Setups displaying orange have run past their predefined end time.
- Items in yellow have run beyond their original schedule time.
|
Note: double-clicking or right-clicking a Job within the display will open its settings window. |
Installing the Projected Schedule Shortcut after Upgrading JAMS
JAMS V6.1.281 added the Projected Schedule function to the Shortcut Bar. For new JAMS installations, the Projected Schedule Shortcut appears by default. However, if you are running an earlier version of JAMS you must first upgrade to JAMS 6.1 or later and then add the Projected Schedule Shortcut using the manual process described below.
- Right-click the Shortcut Bar and select Add Shortcut command from the context menu.
- In the Add a Shortcut wizard, define the Name and Title (e.g., Projected Schedule) and choose an icon. Click the Next button.
- On the View page, choose the Projected Schedule option from the list and click Next.
- On the following page, define the Properties for the Projected Schedule view. For each view you can set different parameters for displaying the schedule (e.g., by Folder or Job name). Select the JAMS Server from the dropdown list, or choose the Active Server option to automatically generate a Projected Schedule using any accessible JAMS server.
- Use Current Schedule: pulls in the current schedule from the Monitor View which is controlled from the “ScheduleAdvance” option in Configuration Settings.
- Include Planned: filters all scheduled Jobs including those with the “Automatically Submit?” option unchecked.
- Include Repeated: allows the Projected Schedule to include Jobs submitted based on their recurrence schedule.
- On the last page of the wizard, confirm your choices. At this point you can create additional Views or change the View properties by selecting the Query button from the Ribbon Bar. Click the Finish button to close the wizard.
- The Projected Schedule Shortcut should now appear in the Shortcut list.